Quickstart
This tutorial helps you get started with a KFP deployment and a pipeline created with the KFP SDK.
Before you begin, you need the following prerequisites:
-
An existing Kubernetes cluster: If you don’t have a Kubernetes cluster, see Installation for instructions about how to get one.
-
The kubectl command-line tool: Install and configure your kubectl context to connect with your cluster.
-
Run the following script to install the KFP SDK:
pip install kfp --preNote: This command installs KFP v2, which is in pre-release stage and is not yet stable. The v2 documentation is being developed continually and some of the links to the v2 documentation might be unavailable.
After you complete the prerequisites, click each step to view the instructions:
Step 1: Deploy a KFP standalone instance into your cluster
This step demonstrates how to deploy a KFP standalone instance into an existing Kubernetes cluster.
Run the following script after replacing PIPELINE_VERSION with the desired version of KFP (release are listed here):
export PIPELINE_VERSION="2.0.0-alpha.4"

kubectl apply -k "github.com/kubeflow/pipelines/manifests/kustomize/cluster-scoped-resources?ref=$PIPELINE_VERSION"
kubectl wait --for condition=established --timeout=60s crd/applications.app.k8s.io
kubectl apply -k "github.com/kubeflow/pipelines/manifests/kustomize/env/dev?ref=$PIPELINE_VERSION"
After you deploy Kubernetes, obtain your KFP endpoint by following these instructions.
Step 2: Create and run a simple pipeline using the KFP SDK
This step shows how to use the KFP SDK to compose a pipeline and submit it for execution by KFP.
The following simple pipeline adds two integers, and then adds another integer to the result to come up with a final sum.
from kfp import dsl
from kfp import client


@dsl.component
def addition_component(num1: int, num2: int) -> int:
    return num1 + num2


@dsl.pipeline(name='addition-pipeline')
def my_pipeline(a: int, b: int, c: int = 10):
    add_task_1 = addition_component(num1=a, num2=b)
    add_task_2 = addition_component(num1=add_task_1.output, num2=c)


endpoint = '<KFP_ENDPOINT>'
kfp_client = client.Client(host=endpoint)
run = kfp_client.create_run_from_pipeline_func(
    my_pipeline,
    arguments={
        'a': 1,
        'b': 2
    },
)
url = f'{endpoint}/#/runs/details/{run.run_id}'
print(url)
The above code consists of the following parts:
-
In the first part, the following lines create a Lightweight Python Component by using the
@dsl.componentdecorator:@dsl.component def addition_component(num1: int, num2: int) -> int: return num1 + num2The
@dsl.componentdecorator transforms a Python function into a component, which can be used within a pipeline. You are required to specify the type annotations on the parameters as well as the return value, as these inform the KFP executor how to serialize and deserialize the data passed between components. The type annotations and return value also enable the KFP compiler to type check any data that is passed between pipeline tasks. -
In the second part, the following lines create a pipeline by using the
@dsl.pipelinedecorator:@dsl.pipeline(name='addition-pipeline') def my_pipeline(a: int, b: int, c: int = 10): ...Like the component decorator, the
@dsl.pipelinedecorator transforms a Python function into a pipeline that can be executed by the KFP backend. The pipeline can have arguments. These arguments also require type annotations. In this example, the argumentchas a default value of10. -
In the third part, the following lines connect the components together to form a computational directed acyclic graph (DAG) within the body of the pipeline function:
add_task_1 = addition_component(num1=a, num2=b)
add_task_2 = addition_component(num1=add_task_1.output, num2=c)
This example instantiates two different addition tasks from the same component named
addition_component, by passing different arguments to the component function for each task, as follows:- The first task accepts pipeline parameters
aandbas input arguments. - The second task accepts
add_task_1.output, which is the output fromadd_task_1, as the first input argument. The pipeline parametercis the second input argument.
You must always pass component arguments as keyword arguments.
- The first task accepts pipeline parameters
-
In the fourth part, the following lines instantiate a KFP client using the endpoint obtained in step 1 and submit the pipeline to the KFP backend with the required pipeline arguments:
endpoint = '<KFP_ENDPOINT>'
kfp_client = client.Client(host=endpoint)
run = kfp_client.create_run_from_pipeline_func(
  my_pipeline,
  arguments={
    'a': 1,
    'b': 2
  },
)
url = f'{endpoint}/#/runs/details/{run.run_id}'
print(url)
In this example, replace
endpointwith the KFP endpoint URL you obtained in step 1.Alternatively, you can compile the pipeline to IR YAML for use at another time:
from kfp import compiler

compiler.Compiler().compile(pipeline_func=my_pipeline, package_path='pipeline.yaml')
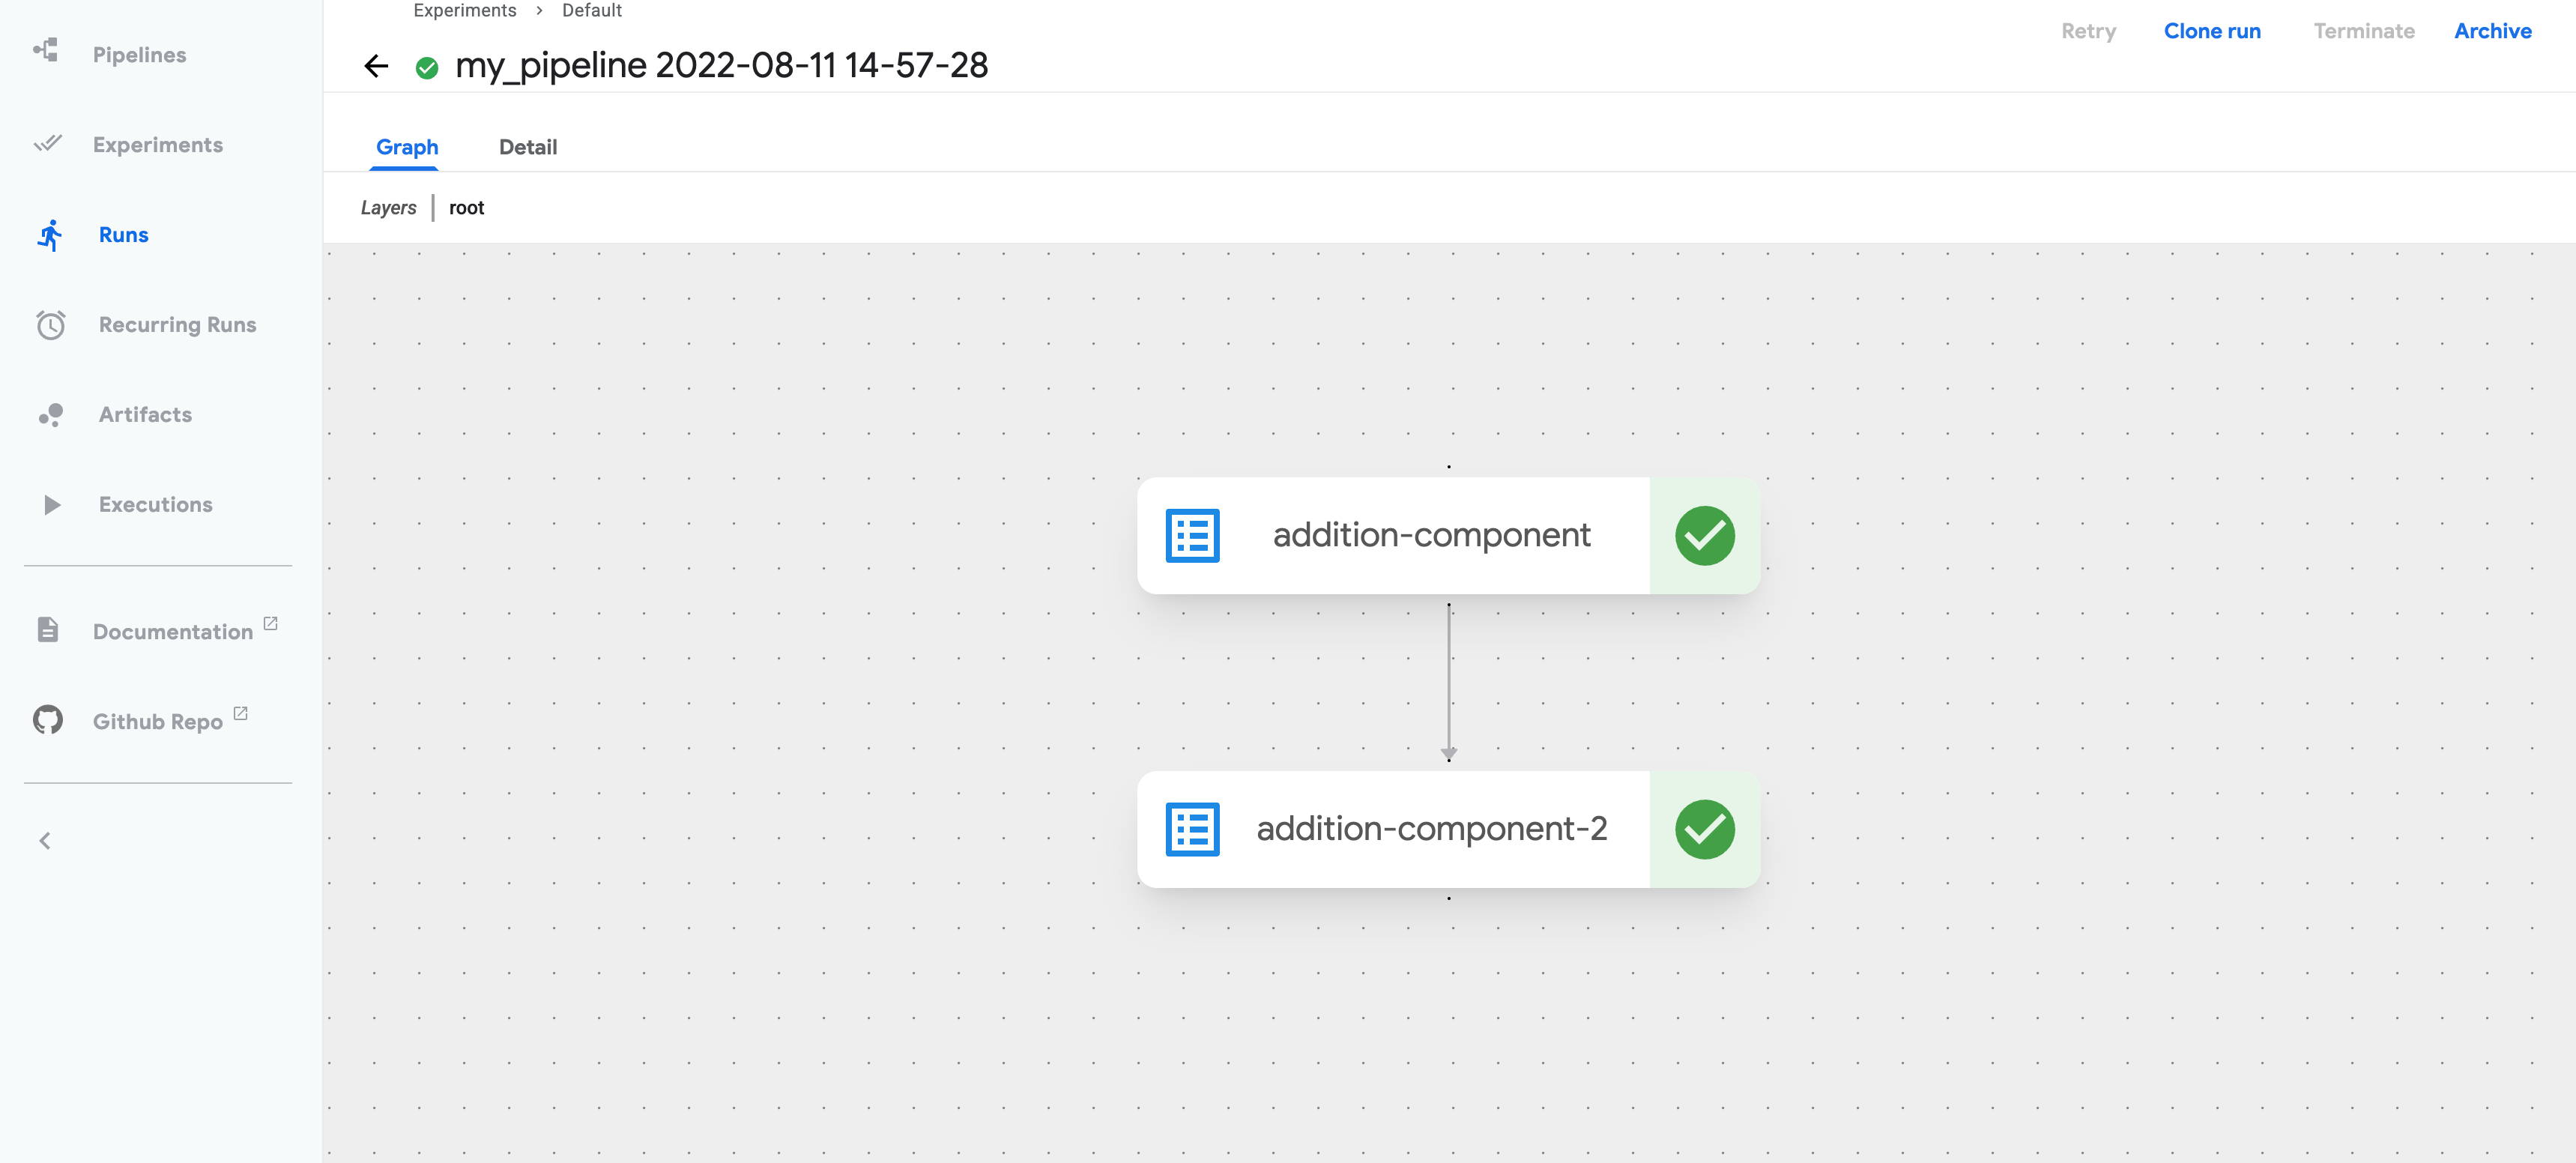
Step 3: View the pipeline in the KFP Dashboard
This step demonstrates how to view the pipeline run on the KFP Dashboard. To do this, go to the URL printed from step 2.
To view the details of each task, including input and output, click the appropriate task node.
Step 4: Build a more advanced ML pipeline
This step demonstrates how to build a more advanced machine learning (ML) pipeline that leverages additional KFP pipeline composition features.
The following ML pipeline creates a dataset, normalizes the features of the dataset as a preprocessing step, and trains a simple ML model on the data using different hyperparameters:
from typing import List

from kfp import client
from kfp import dsl
from kfp.dsl import Dataset
from kfp.dsl import Input
from kfp.dsl import Model
from kfp.dsl import Output


@dsl.component(packages_to_install=['pandas==1.3.5'])
def create_dataset(iris_dataset: Output[Dataset]):
    import pandas as pd

    csv_url = 'https://archive.ics.uci.edu/ml/machine-learning-databases/iris/iris.data'
    col_names = [
        'Sepal_Length', 'Sepal_Width', 'Petal_Length', 'Petal_Width', 'Labels'
    ]
    df = pd.read_csv(csv_url, names=col_names)

    with open(iris_dataset.path, 'w') as f:
        df.to_csv(f)


@dsl.component(packages_to_install=['pandas==1.3.5', 'scikit-learn==1.0.2'])
def normalize_dataset(
    input_iris_dataset: Input[Dataset],
    normalized_iris_dataset: Output[Dataset],
    standard_scaler: bool,
    min_max_scaler: bool,
):
    if standard_scaler is min_max_scaler:
        raise ValueError(
            'Exactly one of standard_scaler or min_max_scaler must be True.')

    import pandas as pd
    from sklearn.preprocessing import MinMaxScaler
    from sklearn.preprocessing import StandardScaler

    with open(input_iris_dataset.path) as f:
        df = pd.read_csv(f)
    labels = df.pop('Labels')

    if standard_scaler:
        scaler = StandardScaler()
    if min_max_scaler:
        scaler = MinMaxScaler()

    df = pd.DataFrame(scaler.fit_transform(df))
    df['Labels'] = labels
    with open(normalized_iris_dataset.path, 'w') as f:
        df.to_csv(f)


@dsl.component(packages_to_install=['pandas==1.3.5', 'scikit-learn==1.0.2'])
def train_model(
    normalized_iris_dataset: Input[Dataset],
    model: Output[Model],
    n_neighbors: int,
):
    import pickle

    import pandas as pd
    from sklearn.model_selection import train_test_split
    from sklearn.neighbors import KNeighborsClassifier

    with open(normalized_iris_dataset.path) as f:
        df = pd.read_csv(f)

    y = df.pop('Labels')
    X = df

    X_train, X_test, y_train, y_test = train_test_split(X, y, random_state=0)

    clf = KNeighborsClassifier(n_neighbors=n_neighbors)
    clf.fit(X_train, y_train)
    with open(model.path, 'wb') as f:
        pickle.dump(clf, f)


@dsl.pipeline(name='iris-training-pipeline')
def my_pipeline(
    standard_scaler: bool,
    min_max_scaler: bool,
    neighbors: List[int],
):
    create_dataset_task = create_dataset()

    normalize_dataset_task = normalize_dataset(
        input_iris_dataset=create_dataset_task.outputs['iris_dataset'],
        standard_scaler=True,
        min_max_scaler=False)

    with dsl.ParallelFor(neighbors) as n_neighbors:
        train_model(
            normalized_iris_dataset=normalize_dataset_task
            .outputs['normalized_iris_dataset'],
            n_neighbors=n_neighbors)


endpoint = '<KFP_UI_URL>'
kfp_client = client.Client(host=endpoint)
run = kfp_client.create_run_from_pipeline_func(
    my_pipeline,
    arguments={
        'min_max_scaler': True,
        'standard_scaler': False,
        'neighbors': [3, 6, 9]
    },
)
url = f'{endpoint}/#/runs/details/{run.run_id}'
print(url)
This example introduces the following new features in the pipeline:
-
Some Python packages to install are added at component runtime, using the
packages_to_installargument on the@dsl.componentdecorator, as follows:@dsl.component(packages_to_install=['pandas==1.3.5'])To use a library after installing it, you must include its import statements within the scope of the component function, so that the library is imported at component runtime.
-
Input and output artifacts of types
DatasetandModelare introduced in the component signature to describe the input and output artifacts of the components. This is done using the type annotation genericsInput[]andOutput[]for input and output artifacts respectively.Within the scope of a component, artifacts can be read (for inputs) and written (for outputs) via the
.pathattribute. The KFP backend ensures that input artifact files are copied to the executing pod’s local file system from the remote storage at runtime, so that the component function can read input artifacts from the local file system. By comparison, output artifact files are copied from the local file system of the pod to remote storage, when the component finishes running. This way, the output artifacts persist outside the pod. In both cases, the component author needs to interact with the local file system only to create persistent artifacts.The arguments for the parameters annotated with
Output[]are not passed to components by the pipeline author. The KFP backend passes this artifact during component runtime, so that component authors don’t need to be concerned about the path to which the output artifacts are written. After an output artifact is written, the backend executing the component recognizes the KFP artifact types (DatasetorModel), and organizes them on the Dashboard.An output artifact can be passed as an input to a downstream component using the
.outputsattribute of the source task and the output artifact parameter name, as follows:create_dataset_task.outputs['iris_dataset'] -
One of the DSL control flow features,
dsl.ParallelFor, is used. It is a context manager that lets pipeline authors create tasks. These tasks execute in parallel in a loop. Usingdsl.ParallelForto iterate over theneighborspipeline argument lets you execute thetrain_modelcomponent with different arguments and test multiple hyperparameters in one pipeline run. Other control flow features includedsl.Conditionanddsl.ExitHandler.
Congratulations! You now have a KFP deployment, an end-to-end ML pipeline, and an introduction to the UI. That’s just the beginning of KFP pipeline and Dashboard features.
Next steps
- See Installation for additional ways to deploy KFP
- See Pipelines to learn more about features available when authoring pipelines
Feedback
Was this page helpful?
Glad to hear it! Please tell us how we can improve.
Sorry to hear that. Please tell us how we can improve.